Some Useful important things about XAMMP for Linux

14 06 2011

Hi, today I’ll mention some important things on XAMPP.

How to set XAMPP to start up programs

(XAMPP will automatically starts with the computer starts)

First login as root user

Now press (Clrt+Alt+T) to open Terminal window
then type sudo -s -H
then enter this command,
command: sudo ln -s /opt/lampp/lampp /etc/init.d/lampp

                    sudo update-rc.d -f lampp defaults

Uninstall XAMPP

First login as root user. then use this on terminal,

command: rm -rf /opt/lampp

————————————————————————————————————————————————————————————————

Start XAMPP

command: /opt/lampp/lampp start

Stop XAMPP

command: /opt/lampp/lampp stop

Stop and start XAMPP

command: /opt/lampp/lampp restart

Start only the Apache

command: /opt/lampp/lampp startapache

Start the Apache SSL support

command: /opt/lampp/lampp startssl

Start only the MySQL database

command: /opt/lampp/lampp startmysql

Start the ProFTPD server

command: /opt/lampp/lampp startftp

Stop the Apache

command: /opt/lampp/lampp stopapache

Stop the Apache SSL support

command: /opt/lampp/lampp stopssl

Stop the MySQL database

command: /opt/lampp/lampp stopmysql

Stop the ProFTPD server

command: /opt/lampp/lampp stopftp

Start a small security check programm

command: /opt/lampp/lampp security

————————————————————————————————————————————————————————————————

Important Files and Directories

The XAMPP commands home—>                 /opt/lampp/bin/
The Apache Document Root directory—>   /opt/lampp/htdocs/
The Apache configuration file—>                 /opt/lampp/etc/httpd.conf
The MySQL configuration file—>                /opt/lampp/etc/my.cnf
The PHP configuration file—>                       /opt/lampp/etc/php.ini
The ProFTPD configuration file—>              /opt/lampp/etc/proftpd.conf
The phpMyAdmin configuration file—>     /opt/lampp/phpmyadmin/config.inc.php

If you have any doubt about any post feel free to comment and get solved tham.

Thanks

Gihan Malan De Silva.


How to install XAMPP on Linux (Ubuntu 11.04) Part #2

13 06 2011

Ok this is the second part of the previous post.If you haven’t read the first part “How to install XAMPP on Linux (Ubuntu 11.04)” please read it before come to this 😀 . Today I’ll tell you how to configure MySQL databases (phpMyAdmin). Because config.inc.php is not set to your Linux username so,you are not still allowed to goto the phpMyadmin page.

First you should get open the terminal and login as root user.

Now press (Clrt+Alt+T) to open Terminal window
then type sudo -s -H

command: cd /opt/lampp/phpmyadmin

Now you are in the phpmyadmin directory, you need to change the ownership of the file config.inc.php to your own Linux username.

command:chown your_user_name:your_user_name config.inc.php

Ok now there is one thing to do.That’s Configure Linux XAMPP Security

In this case too you need to login as root user(only if already logout).Now lets set up the security.

command: /opt/lampp/lampp security

Then the terminal will be ask some questions , type “YES” to all and set password to all. Important thing is write them down in a safe place.

After configuring security the database configuration file alteration automatically happened ,so  you need to change the ownership back to your username as did earlier.

command: cd /opt/lampp/phpmyadmin

command:chown your_user_name:your_user_name config.inc.php

Now you are done with configuring XAMPP 😀 . Restart the XAMPP with this command

command: /opt/lampp/lampp restart

Now check out your overall installation process. First you need to clear your entire browsing history and cache.

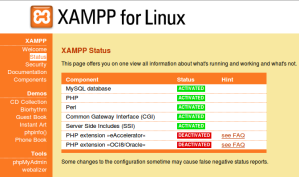
Type this on your browser : http://localhost/ then click on “Status” link. If all the things are done correctly, you will see a message like this.

XAMPP Status

XAMPP Status

Now you should be able to login to phpMyAdmin without any trouble. Login with your MySQL username and password that you gave at security configuration.

Important! :

  • phpMyAdmin has to accounts for MySQL as user names root and pma, but both have one password, that you gave. If login as root user, you will be able to have all privileges. But if you log in as pma user privileges will be limited and you are not allowed to create databases (only create tables and access the database).
  • Do not overwrite or delete default files inside your htdocs, becasue they are very important.If you do s XAMPP may be crashed.

webalizer
xampp
favicon.ico
index.php

If you have any doubt about any post feel free to comment and get solved tham.

Thanks

Gihan Malan De Silva.


How to install XAMPP on Linux (Ubuntu 11.04)

9 06 2011

Hi, this is my second post.In first post I mentioned about how to run & configure XAMPP on windows computer. XAMPP may be the best server to PHP. Now its time to move into Linux. Currently I’m using Ubuntu 11.04 Natty Narwhal edition. Based on that I’ll show you how to install XAMPP on Linux OS.

Earlier day the Linux version of XAMPP called as LAMPP. But it comes as XAMPP with more improvements.

Ok, First of all you need to download the XAMPP for Linux form Apachi Friends.
here is the link for it :http://www.apachefriends.org/en/xampp-linux.html

Before installation , its better to have a MD5 check.To do that you need to login as root user.
1) Now press (Clrt+Alt+T) to open Terminal window
then type sudo -s -H
it will ask your password after that
2) type md5sum xampp-linux-1.7.4.tar.gz
the displaying MD5 should be 7d83c9829d8c79d43ea607e5b009dc58

3) Now you should extract the downloaded archive file to /pot directory

command: tar xvfz xampp-linux-1.7.4.tar.gz -C /opt

You shouldn’t use any extracting tool to extract the archive, it won’t work.And if you already installed a XAMPP version, it will overwritten by this command.Now XAMPP is installed below the /opt/lampp directory.

Now you can check whether XAMPP is working.

command: sudo /opt/lampp/lampp start
you will see a message like this

Ok now XAMPP is working 😀 .But still there is a problem. Your php testing folder is “htdocs”. You can simply move into it  File System–>opt–>lampp–>htdocs

You will noticed that it won’t allow you to put .php file or any thing. Because you haven’t owe the permission yet. Because it belongs to root user.

Change the ownership XAMPP to your user account!

In this case also you need to login as root user.
Now press (Clrt+Alt+T) to open Terminal window
command: sudo -s -H

Now move to lampp folder
command: cd /opt/lampp/

command: chown -R yourUserName:yourUserName htdocs

Important: Here yourUserName is just your user account name of Linux

Also you need to associate ownership of your Linux username with the Apache configuration. In this case move to “etc” folder:

command: cd /opt/lampp/etc/
Now you are in the etc directory. Type gedit httpd.conf. This will show the Linux text editor.

command: gedit httpd.conf

But be careful when editing; a single mistake can make the Apache web server inoperable.
Then find (press Ctrl+F) the following line in that text file..

The text file look like this…

==========================
User nobody

Group nogroup

</IfModule>

</IfModule>
===========================
Change this to:

==========================
User yourUserName

Group nogroup

</IfModule>

</IfModule>
==========================

A picture of the text file on my computer…

Now you can reboot the computer..
After that open the terminal (Ctrl+Alt+T)

then start XAMPP
command: sudo /opt/lampp/lampp start

Then go to firefox type this on address bar http://localhost/
It will take you to the XAMPP welcome page..
Now you can start programming php scripts.. put your PHP script files into “htdocs” folder as I mentioned earlier.
If your php script name is test.PHP ,type this on address bar of firefox.
http://localhost/test.PHP

If you are a beginner and want an test php script.Here it is…

See you in post with How to configure MySQL database (phpMyAdmin) in XAMPP

Enjoy it
Thanks
Gihan