How to create a GUI(Graphical User Interface) using C programming Language.. (part 3)

17 08 2011

Hi, this is the third part of the How to create a GUI(Graphical User Interface) using C programming Language.. (part 2) post as I promised. In today’s post I’m going to tell you how to create and run Simple hello world GUI program.

And it includes how display a message when click a button.


Ok now open a new glade project and draw a GUI like above image. You have three components one label and two buttons.

Then set properties like this.

  • For the main Window

General–> Name= mainWindow
General–>Resizable= No
Common–>Height request = 400
Common–>Width request=200

  • For Display Label

General–>Name=displayLabel

General–>Label=Display

  • For Display Button

General–>Name=displayButton

General–>Label=Display

Signals–>Clicked=on_displayButton_clicked

  • For Exit Button

General–>Name=exitButton

General–>Label=Exit

Signals–>Clicked=on_exitButton_clicked

Then save it as hello.glade in libglade format.

Now open CodeBlock’s Gtk+ project. When you open a new it will automatically generates some codes, so erase and clear main.c .Then copy paste this code into your main.c .

Then copy your hello.glade file into CodeBlock project folder.

#include <stdio.h>
#include <gtk/gtk.h>
#include <glade/glade.h>

/*
Author : Gihan De Silva
gihansblog.com
*/

GladeXML *xml;
GtkWidget *widget;
GtkWidget *display;

G_MODULE_EXPORT void on_displayButton_clicked(GtkButton *button,gpointer *data)
{
/* Find the Glade XML tree containing widget. */
xml = glade_get_widget_tree(GTK_WIDGET( widget ));

/* Pull the widgets out of the tree */
display= glade_xml_get_widget(xml, “displayLabel”);

gtk_label_set_text(GTK_LABEL(display),”Hello World!\n gihansblog.com”);
}

G_MODULE_EXPORT void on_exitButton_clicked(GtkButton *button,gpointer *data)
{
gtk_main_quit();
}

int main(int argc, char *argv[])
{

gtk_init(&argc, &argv);

/*import glade file*/
xml = glade_xml_new(“hello.glade”, NULL, NULL);

/* get a widget (useful if you want to change something) */
widget = glade_xml_get_widget(xml, “mainWindow”);

/* connect signal handlers */
glade_xml_signal_autoconnect(xml);

/*show widget*/
gtk_widget_show (widget);

gtk_main();

return 0;
}

Now run the project. If everything ok it will look like this and will function well :D.

The program in CodeBlocks…

Main Code Explained…

First we should initialise gtk in our code.

gtk_init(&argc, &argv);

Then we have to import our .glade file into our program and convert it into xml file format.

xml = glade_xml_new(“hello.glade”, NULL, NULL);

Now signals of widgets should be functioning with this line.

glade_xml_signal_autoconnect(xml);

And with this line, it will show the GUI at run time.

gtk_widget_show (widget);

Then call gtk main method

gtk_main();

Exit Button Code Explained…

In the exit button we call
gtk_main_quit();

to quit fro the program.

Display Button Code Explained…

Then find the Glade XML tree containing widget.
 xml = glade_get_widget_tree(GTK_WIDGET( widget ));

Now pull the label widgets out of the tree
 display= glade_xml_get_widget(xml, “displayLabel”);

Display the message on the label
gtk_label_set_text(GTK_LABEL(display),”Hello World!\n gihansblog.com”);

Ok that’s all for today :D. If you want, you can DOWNLOAD my CodeBlock project here!. In next post I will show you how to add a Text Entry widget to your application.

Thank you

Gihan De Silva


How to create a GUI(Graphical User Interface) using C programming Language.. (part 2)

13 08 2011

Hi, this is the second part of the How to create a GUI(Graphical User Interface) using C programming Language..   post. In today’s post I’m going to tell you how to use Glade software to design a GUI for a C program. Now I think you have prepared your development environment :D.First we need to recognise the Glade environment..
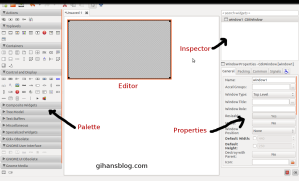
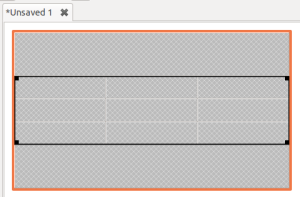
  • Open glade, then you will a window like this. In the Top Levels tab of Palette select window and click on Editor.Then you will a Gray colour window on it. In the inspector view you can change the name of the window. To change the size and other properties go to properties.  This is not much smiler to Net-beans IDE, aligning component is much difficult. But this is much easier than hard coding :-).
  • Now we should add a container for the window to keep the other component on it. In the Containers tab of Palette select one of containers like Vertical Box then click on the Editor’s window.
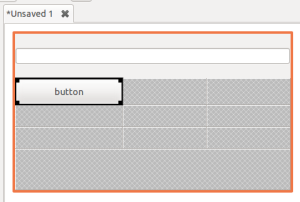
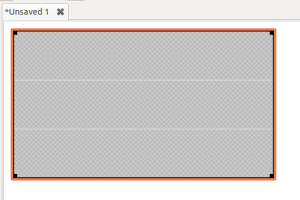
  • Then It will look like this. But for example if you add a button component to one of this cell, it fills all overt the cell. But if you need you can further divide into more cells adding one or more containers. For example here I will add another table container into middle cell. Then it will look like this.
  • Ok now I’m going to add some component to it. Under Control and Display tab of the palette, find Button and Text Entry widgets(components), so add it the container.

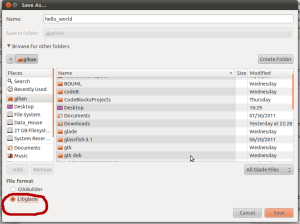
Ok now Save the GUI you designed. In the Save or Save As menu, there are two options to save.

  1. GtkBuilder
  2. Libglade

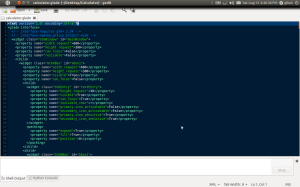
Choose the File Format Libglade, and save it as hello_world.glade, because in this tutorial I work with libglade. If you just look at your .glade file by opening with Texteditor. You will see XML coding there.. Yes! of course .glade is XML file format. GtkBuilder file type also generates the same .glade file. But when taken in the file structure GtkBuilder and Libglage are different from each other.

Now I think you may wondering how to connect this Button signals(Actions) to a C program ??

Now click on the Button of your GUI, then click Signals tab under the Properties. Then find Clicked and select on_button1_clicked (Button’s name property is ‘button1’ , so the signal name become on_button1_clicked). Now Save changes.

After we set the signals in our GUI in the glade, we can simply call them (as example) like this.

void on_button1_clicked(GtkWidget *widget,gpointer *data){

// your custom code here!

}// end method

Ok in next post we will discuss how run a hello_world GUI program using C :D.


Thank you

Gihan De Silva


How to create a GUI(Graphical User Interface) using C programming Language..

12 08 2011

How to create a GUI(Graphical User Interface) using C programming Language???  That was a big problem to me when I’m in the University first year. I knew Java GUI Designing, but couldn’t find way to do it in C language. I spent many time to learn that. I think now it’s time to share those knowledge :D. But since there are lot to discuss on that topic, I’m going to spelt the whole tutorial into several posts.  In this post I’ll discuss how to set up the development environment.

Setting up the development environment for C language GUI designing.

Ok let’s begin. First we need to have several tools for that.

1) Code Blocks IDE

2) Glade IDE

3) Gtk+

4) Libglade library

So install those things on your computer. I’ll give a hint to get it much easier. If you are Ubuntu user, go to Ubuntu software center or Synaptic package manager. Find code blocks and install. Then Find for Glade and before install, check all the Add-ons then install. In this way it will automatically install gtk+ and libglade. So you don’t want to worry about that:D.

A screen shot of Code Blocks IDE..

Now you have to configure Compiler and Debugger settings in Codeblocks IDE.

  • Open Code Blocks–> goto Compiler and Debugger settings

  • Select Other options in Compiler settings tab and paste this.

            `pkg-config –cflags gtk+-2.0 gmodule-export-2.0`
            `pkg-config –cflags libglade-2.0`

  • Then select Other linker options in Linker settings tab and paste this.

           `pkg-config –libs gtk+-2.0 gmodule-export-2.0`
           `pkg-config –libs libglade-2.0`

A screen shot of Glade Interface designer…


But you always free to compile your program on the terminal too. If you wish to do so it should be like this.

gcc `pkg-config –cflags libglade-2.0 –libs gtk+-2.0“pkg-config –libs gtk+-2.0 gmodule-export-2.0` main.c

Ok thats all for now . In next post I’ll explain how to Design a GUI using Glade Interface Designer :D.


Thank you

Gihan Malan De Silva @ gihansblog.com


How to change the boot loader

4 08 2011

Hi, today I’m going to introduce an important windows software . The reason to talk about this software was an personal experience of me. Recently I had to install Win 7 on my Laptop to work with Photoshop CS5 for designing some graphics. So after I install the Win 7 suddenly I realise then my Ubuntu is no more functioning. That means Master Boot Record was changed. In that case , I used Easy BCD software to correct that boot records.

DOWNLOAD Easy BCD here!

Installing Win7 after Linux always happens this. So you have to change boot records after installing (only if you don’t see the boot menu).

To change the boot records with the dual boot system. Open Easy BCD

Then click Add New Entry . Then you will see a window like this.

Then click Linux BSD tab, change under type: as GRUB(Legacy)

Then reboot the computer, you will see your boot menu. That’s all 😀

In this post I would like to mention and say thanks to my friend Buddika for introducing EasyBCD to me.

Thanks

Gihan De Silva @ gihansblog.com