How to create a GUI(Graphical User Interface) using C programming Language.. (part 5)

28 10 2011

Hi, everyone it’s been a long time., yes, ok now I’m back with some Tech things. As promised , today I’m going to blog about how to create Mini-Calculator with C language GUI. So before get started I thing it’s better to read past articles on this topic, because some guys informed they didn’t get it very clear. I think that happens because they didn’t go through the past articles related to this one before read the fresh one 😀 .

Mini Calculator v 1.0

So here is related articles …. read them first

1) How to create a GUI(Graphical User Interface) using C programming Language..

2) How to create a GUI(Graphical User Interface) using C programming Language.. (part 2)

3) How to create a GUI(Graphical User Interface) using C programming Language.. (part 3)

4) How to create a GUI(Graphical User Interface) using C programming Language.. (part 4)

Now open Glade Software and create a user interface with these settings.

  • For the main Window

General–> Name= mainWindow
General–>Resizable= No
Common–>Height request = 400
Common–>Width request=250

  • For Display Label

General–>Name=displayLabel

General–>Label=Mini-Calculator v1.0 | gihansblog.com

  • For Text Entry

General–>Name=textEntry

  • For Exit Button

General–>Name=exitButton

General–>Label=Exit

Signals–>Clicked=on_exitButton_clicked

  • For  Button 0 to 9

General–>Name=no1Button

General–>Label=1

Signals–>Clicked=on_no1Button_clicked

General–>Name=no2Button

General–>Label=2

Signals–>Clicked=on_no2Button_clicked ………

  • For + Button

General–>Name=addButton

General–>Label=+

Signals–>Clicked=on_addButton_clicked

  • For – Button

General–>Name=subButton

General–>Label= –

Signals–>Clicked=on_subButton_clicked

  • For x Button

General–>Name=mulButton

General–>Label= x

Signals–>Clicked=on_mulButton_clicked

  • For ÷ Button

General–>Name=divButton

General–>Label=  ÷

Signals–>Clicked=on_divButton_clicked

  • For √ Button

General–>Name=sqrtButton

General–>Label= √

Signals–>Clicked=on_divButton_clicked

After you finish with Glade it should be similar to this..
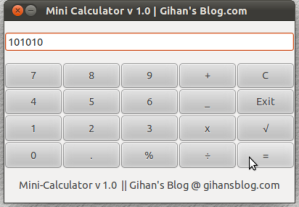
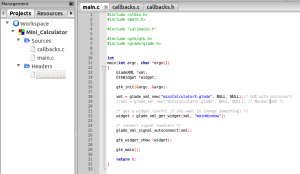
Mini Calculator v 1.0  Gihan's Blog.comNow open Colde Blocks gtk project. Erase the default contents of main.c . Here I have changed the structure of the project like this ..

1) main.c

2) callbacks.c

3) callbacks.h

main.c contains the main method of programm, and callbacks.c contains the rest of methods and callback.h header file contains functions prototypes of methods that contains callback.c

project_structure_ gihansblog.com

DOWNLOAD  the Source code!

Here I’m not going to explain all the things, because I’ve already explained most of it in previous articles.

Code Explained…

GladeXML *xml;
GtkWidget *textValue;

gdouble display;
gdouble primaryTotal=0;//primary total
gdouble mainTotal=0;

gchar *d_string;

int clickedButton=0;// find the clicked buttton default is zero ‘0’.
                    /*
                    Values of ‘clickedButton’
                    ————————
                    plusButton_clicked –>1
                    subButton_clicked  –>2
                    mulButton_clicked  –>3
                    divButton_clicked  –>4
                    */

Mainly in here, what we do with a calculator is do some calculation. For example think we are going to do this operation “1+2”. So first what we do is hit the “1” button and hit “+” and “2”, then press “=” to get the result on the text entry. In this algorithm , when pressing the “1” button it gives the “1” value to the text entry and when “+” button clicked it stores the display value in display variable and get the sum with primaryTotal variable and put it to again primaryTotal . Then we press “2”. So now this also displays on the text entry, then “=” button clicked ,it should chose the correct operation(at this time, it is “+”) in the operation primaryTotal value should do the related operation with display then should put it again into mainTotal. For example in addition it should be

mainTotal=primaryTotal+display;

G_MODULE_EXPORT void on_no1Button_clicked(GtkWidget *widget, gpointer *data)
{
    /* Find the Glade XML tree containing widget. */
    xml = glade_get_widget_tree(GTK_WIDGET( widget ));

    /* Pull the widgets out of the tree */
    textValue= glade_xml_get_widget(xml, “textEntry”);

    gtk_entry_append_text(GTK_ENTRY(textValue),”1″);
}
Here first line gets the widget tree to a GladeXML type variable. Then second line gets the textEntry value to the GtkWidget type variable called textValue. Third line set “1” to the textEntry object as append action. Like this all 0-9 button code works.

G_MODULE_EXPORT void on_addButton_clicked(GtkWidget *widget, gpointer *data)
{
    /* Find the Glade XML tree containing widget. */
    xml = glade_get_widget_tree(GTK_WIDGET( widget ));

    /* Pull the widgets out of the tree */
    textValue= glade_xml_get_widget(xml, “textEntry”);

    /* Get the string value form the Entry widgets */
    d_string=gtk_entry_get_text(GTK_ENTRY(textValue));

    /* convert it into the double */
    display=atof(d_string);

    /* Add it to the primary total */
    primaryTotal=primaryTotal+display;

    /* Clear the entry*/
    gtk_entry_set_text(GTK_ENTRY(textValue),””);

    /* Set clicked button as 1 ‘plusButton_clicked’ */
    clickedButton=1;
}
In this method first 3 lines are similar to above explanation. In third line I have used atof() function from math.h header. It converts the string value to double. Because we need double values to calculate the maths. Next line gets the sum of primaryTotal and display variables. Then clearing the textEntry field it sets clickedButton variable to 1, to mention that the operation is set to summation. Like wise, value of clickedButton says the operation to do.
Values of ‘clickedButton’
————————
plusButton_clicked –>1
subButton_clicked  –>2
mulButton_clicked  –>3
divButton_clicked  –>4

G_MODULE_EXPORT void on_equalButton_clicked(GtkWidget *widget, gpointer *data)
{
    /* Find the Glade XML tree containing widget. */
    xml = glade_get_widget_tree(GTK_WIDGET( widget ));

    /* Pull the widgets out of the tree */
    textValue= glade_xml_get_widget(xml, “textEntry”);

    /* Read the entry value and copy it to a char* */
    d_string=gtk_entry_get_text(GTK_ENTRY(textValue));

    /* convert the string to double*/
    display=atof(d_string);

    /*Do the oprations according to clicked button*/

        switch(clickedButton)
        {
            case 0 :{
                    break;
                    }

            case 1 :{
                    /* Do Addition*/
                    mainTotal=primaryTotal+display;
                    break;
                    }

            case 2 :{
                    /* Do Substraction*/
                    mainTotal=primaryTotal-display;
                    break;
                    }

            case 3 :{
                    /* Do Multipication*/
                    mainTotal=primaryTotal*display;
                    break;
                    }

            case 4 :{
                    /* Do Division*/
                    mainTotal=primaryTotal/display;
                    break;
                    }

        }// end switch

    /*convert double to string and print the value on entry*/
    gtk_entry_set_text(GTK_ENTRY(textValue),g_strdup_printf(“%f”,mainTotal));

    /* set total to zreo ‘0’*/
    primaryTotal=0;

    /* Set clickedButton value back to the default*/
}

In this method the switch structure decides which operation to do. After doing the related calculation in a case, it should display the main in text entry. But double values are not allowed in the text entry widget, so we have to convert it to String (char *) type.

gtk_entry_set_text(GTK_ENTRY(textValue),g_strdup_printf(“%f”,mainTotal)); this line is responsible for that conversion.

Now I think I’ve explained all the main things about the program here.

If you want the calculator look like the first image. You should do it with the Glade designer like this.

Open the Glade designer project and click on a button you want to add an image. Think you want to change the image of “1” button. Then click on “1” button then go to General tab under Properties check the radio button “Add custom button content”  . Now you see the appearance of the button is changed. Then click on image widget under Displays and Controls, after that click the “1” Button again.

Find some appropriate button image or draw something like this.

Then go to General tab under Properties and check radio button File Name and set the path for image file. 😀 then you will see it at the run time.

Ok that’s all for today :D . You can DOWNLOAD my CodeBlock project here!. Good luck.

Thank you

Gihan De Silva


How to create a GUI(Graphical User Interface) using C programming Language.. (part 4)

9 09 2011

Hi,  after a long time I was able to find a time to write the blog, because these days I’m very busy with my exam and it will end 29th  September. So until that I doubt I’d be able to write much. So sorry for that my all friends who read this.

Related articles..

1) How to create a GUI(Graphical User Interface) using C programming Language..

2) How to create a GUI(Graphical User Interface) using C programming Language.. (part 2)

3) How to create a GUI(Graphical User Interface) using C programming Language.. (part 3)

And this article focus on  how to use a Text Entry with button action signals.  And the purpose of this program is display the string in the label,which user enter in the text entry.

Contents…

1) Open a Code Blocks projects

2) Open a Glade Project

3) Set properties for the components

4) Code the C Gtk project

5) Run the project

Components

1) Window= mainWindow

2) Label= displayLabel

3) Text Entry= textEntry

4) Button= displayButton

5) Button= exitButton

Set properties

  • For the main Window

General–> Name= mainWindow
General–>Resizable= No
Common–>Height request = 400
Common–>Width request=200

  • For Display Label

General–>Name=displayLabel

General–>Label=Display

  • For Display Button

General–>Name=displayButton

General–>Label=Display

Signals–>Clicked=on_displayButton_clicked

  • For Exit Button

General–>Name=exitButton

General–>Label=Exit

Signals–>Clicked=on_exitButton_clicked

  • For Text Entry

General–>Name=textEntry

Then save it as TextEntry.glade in libglade format in the CodeBlocks project folder.

In this C project I divided the whole project into three files.

1) main.c

2) callback.c

3) callback.h

The source code of main.c 

#include <stdio.h>
#include <gtk/gtk.h>
#include <glade/glade.h>

/*
Author : Gihan De Silva
gihansblog.com

Purpose: This program displays the string in the label,which user enter in the text entry.
*/
GladeXML *xml;
GtkWidget *widget;

int main(int argc, char *argv[])
{

gtk_init(&argc, &argv);

/*import glade file*/
xml = glade_xml_new(“TextEntry.glade”, NULL, NULL);

/* get a widget (useful if you want to change something) */
widget = glade_xml_get_widget(xml, “mainWindow”);

/* connect signal handlers */
glade_xml_signal_autoconnect(xml);

/*show widget*/
gtk_widget_show (widget);

gtk_main();

return 0;
}

The source code of callback.c

#include <stdio.h>
#include <gtk/gtk.h>
#include <glade/glade.h>

GladeXML *xml;
GtkWidget *display;
GtkWidget *textValue;

gchar *d_string;

G_MODULE_EXPORT void on_displayButton_clicked(GtkButton *button,gpointer *data)
{

/* Pull the widgets out of the tree */
display= glade_xml_get_widget(xml, “displayLabel”);

textValue= glade_xml_get_widget(xml, “textEntry”);

/* Get the string value form the Entry widgets */
d_string=gtk_entry_get_text(GTK_ENTRY(textValue));

gtk_label_set_text(GTK_LABEL(display),d_string);
}

G_MODULE_EXPORT void on_exitButton_clicked(GtkButton *button,gpointer *data)
{
gtk_main_quit();
}

The source code of callback.h

G_MODULE_EXPORT void on_displayButton_clicked(GtkButton *button,gpointer *data);
G_MODULE_EXPORT void on_exitButton_clicked(GtkButton *button,gpointer *data);

Now run the gtk project and it will look like this.


And when you hit the Display button, it will display the content in the text entry..

Display Button Code Explained…

Here I’m not going to explain all the code because I already have explained them in previous articles. If you haven’t read previous article, you’d better to read them first. But I’m going to explain the specific things related to this article.

GladeXML *xml;
GtkWidget *display;
GtkWidget *textValue;

gchar *d_string;

G_MODULE_EXPORT void on_displayButton_clicked(GtkButton *button,gpointer *data)
{
/* Pull the widgets out of the tree */
display= glade_xml_get_widget(xml, “displayLabel”);

textValue= glade_xml_get_widget(xml, “textEntry”);

In these two lines, the program will take glade widgets into Gtk widgets.

/* Get the string value form the Entry widgets */
d_string=gtk_entry_get_text(GTK_ENTRY(textValue));

We can’t directly use GtkWidgets to set gtk label, because it needs gchar* type data. So in here we convert to into gchar* .

gtk_label_set_text(GTK_LABEL(display),d_string);

Now with above line we can set it to the label.

}

Ok that’s all for today :D . If you want, you can DOWNLOAD my CodeBlock project here!. In next post I will show you how to create a simple Calculator using Gtk and Glade.

Thank you

Gihan De Silva


How to create a GUI(Graphical User Interface) using C programming Language.. (part 3)

17 08 2011

Hi, this is the third part of the How to create a GUI(Graphical User Interface) using C programming Language.. (part 2) post as I promised. In today’s post I’m going to tell you how to create and run Simple hello world GUI program.

And it includes how display a message when click a button.


Ok now open a new glade project and draw a GUI like above image. You have three components one label and two buttons.

Then set properties like this.

  • For the main Window

General–> Name= mainWindow
General–>Resizable= No
Common–>Height request = 400
Common–>Width request=200

  • For Display Label

General–>Name=displayLabel

General–>Label=Display

  • For Display Button

General–>Name=displayButton

General–>Label=Display

Signals–>Clicked=on_displayButton_clicked

  • For Exit Button

General–>Name=exitButton

General–>Label=Exit

Signals–>Clicked=on_exitButton_clicked

Then save it as hello.glade in libglade format.

Now open CodeBlock’s Gtk+ project. When you open a new it will automatically generates some codes, so erase and clear main.c .Then copy paste this code into your main.c .

Then copy your hello.glade file into CodeBlock project folder.

#include <stdio.h>
#include <gtk/gtk.h>
#include <glade/glade.h>

/*
Author : Gihan De Silva
gihansblog.com
*/

GladeXML *xml;
GtkWidget *widget;
GtkWidget *display;

G_MODULE_EXPORT void on_displayButton_clicked(GtkButton *button,gpointer *data)
{
/* Find the Glade XML tree containing widget. */
xml = glade_get_widget_tree(GTK_WIDGET( widget ));

/* Pull the widgets out of the tree */
display= glade_xml_get_widget(xml, “displayLabel”);

gtk_label_set_text(GTK_LABEL(display),”Hello World!\n gihansblog.com”);
}

G_MODULE_EXPORT void on_exitButton_clicked(GtkButton *button,gpointer *data)
{
gtk_main_quit();
}

int main(int argc, char *argv[])
{

gtk_init(&argc, &argv);

/*import glade file*/
xml = glade_xml_new(“hello.glade”, NULL, NULL);

/* get a widget (useful if you want to change something) */
widget = glade_xml_get_widget(xml, “mainWindow”);

/* connect signal handlers */
glade_xml_signal_autoconnect(xml);

/*show widget*/
gtk_widget_show (widget);

gtk_main();

return 0;
}

Now run the project. If everything ok it will look like this and will function well :D.

The program in CodeBlocks…

Main Code Explained…

First we should initialise gtk in our code.

gtk_init(&argc, &argv);

Then we have to import our .glade file into our program and convert it into xml file format.

xml = glade_xml_new(“hello.glade”, NULL, NULL);

Now signals of widgets should be functioning with this line.

glade_xml_signal_autoconnect(xml);

And with this line, it will show the GUI at run time.

gtk_widget_show (widget);

Then call gtk main method

gtk_main();

Exit Button Code Explained…

In the exit button we call
gtk_main_quit();

to quit fro the program.

Display Button Code Explained…

Then find the Glade XML tree containing widget.
 xml = glade_get_widget_tree(GTK_WIDGET( widget ));

Now pull the label widgets out of the tree
 display= glade_xml_get_widget(xml, “displayLabel”);

Display the message on the label
gtk_label_set_text(GTK_LABEL(display),”Hello World!\n gihansblog.com”);

Ok that’s all for today :D. If you want, you can DOWNLOAD my CodeBlock project here!. In next post I will show you how to add a Text Entry widget to your application.

Thank you

Gihan De Silva


How to create a GUI(Graphical User Interface) using C programming Language.. (part 2)

13 08 2011

Hi, this is the second part of the How to create a GUI(Graphical User Interface) using C programming Language..   post. In today’s post I’m going to tell you how to use Glade software to design a GUI for a C program. Now I think you have prepared your development environment :D.First we need to recognise the Glade environment..
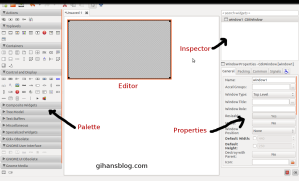
  • Open glade, then you will a window like this. In the Top Levels tab of Palette select window and click on Editor.Then you will a Gray colour window on it. In the inspector view you can change the name of the window. To change the size and other properties go to properties.  This is not much smiler to Net-beans IDE, aligning component is much difficult. But this is much easier than hard coding :-).
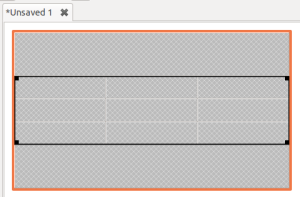
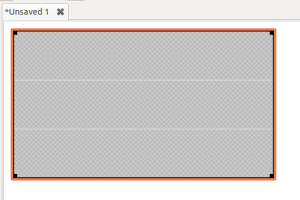
  • Now we should add a container for the window to keep the other component on it. In the Containers tab of Palette select one of containers like Vertical Box then click on the Editor’s window.
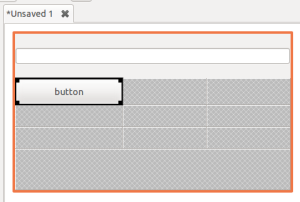
  • Then It will look like this. But for example if you add a button component to one of this cell, it fills all overt the cell. But if you need you can further divide into more cells adding one or more containers. For example here I will add another table container into middle cell. Then it will look like this.
  • Ok now I’m going to add some component to it. Under Control and Display tab of the palette, find Button and Text Entry widgets(components), so add it the container.

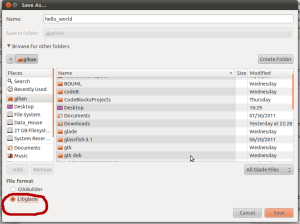
Ok now Save the GUI you designed. In the Save or Save As menu, there are two options to save.

  1. GtkBuilder
  2. Libglade

Choose the File Format Libglade, and save it as hello_world.glade, because in this tutorial I work with libglade. If you just look at your .glade file by opening with Texteditor. You will see XML coding there.. Yes! of course .glade is XML file format. GtkBuilder file type also generates the same .glade file. But when taken in the file structure GtkBuilder and Libglage are different from each other.

Now I think you may wondering how to connect this Button signals(Actions) to a C program ??

Now click on the Button of your GUI, then click Signals tab under the Properties. Then find Clicked and select on_button1_clicked (Button’s name property is ‘button1’ , so the signal name become on_button1_clicked). Now Save changes.

After we set the signals in our GUI in the glade, we can simply call them (as example) like this.

void on_button1_clicked(GtkWidget *widget,gpointer *data){

// your custom code here!

}// end method

Ok in next post we will discuss how run a hello_world GUI program using C :D.


Thank you

Gihan De Silva