Hi, today I’m going to show you how to install Joomla 1.6 and configure it with XAMPP. Joomla is a nice open source software that allows you to create web pages easily. To getting start with Joomla first you need to install XAMPP on your computer. If you haven’t install it yet, read my post about “How to install XAMPP on ubuntu 11.04” and install it first.
 If you have already installed XAMPP, then download the newest version of Joomla or any Joomla version.
Download Joomla 1.6 from here!
After downloading the Joomla_1.6.3-Stable-Full_Package.zip file , copy it to the location File System–>opt–>lampp–>htdocs (/opt/lampp/htdocs).
Then extract it and remove Joomla_1.6.3-Stable-Full_Package.zip
Then rename the folder Joomla_1.6.3-Stable-Full_Package as joomla
Then start XAMPP using command: sudo /opt/lampp/lampp start on terminal(clrt+T).
Now go to firefox and type http://localhost/joomla and enter. If everything works fine. The displaying page will look like this.
 This is the first page of installation process, select your language that you want to be installed from the list an click OK. Then it will move to the Pre-installation check page.
 In here if something mark as No in the upper table, you should take action to solve it. if every thing says YES, click Next. Then it will move to the Licence page.
It says about GNU GENERAL PUBLIC LICENSE. Read the licence 😉 and click Next. Then it will move to the Database page.
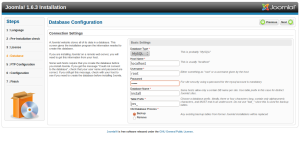
Fill these fields like this:
Database type: MySQL
Host name: localhost
User name: root
Password: ***** (This is the password which you configured XAMPP security for the mysql. if you didn’t set password, just leave it)
Database name: install or somename
Table prifix: jos_ (by default)
Old database process: Backup
Then click Next. Then it will move to the FTP configuration page.
Leave it!, because the settings for the FTP Configuration can be entered, or edited after installation.It’s easy for us.So click Next.It will be move to the Configuration page.
 Fill these field like this and keep details in a safe place.
Site Name: myJoomlaSite or somename
Your E-mail: give a email address
Admin username: admin (by default)
Admin password: ***** (give a password)
Confirm Admin password: ***** (retype Admin password)
Then Click Install Sample Data, after clicking it will be shown Sample Data installed successfully.
Then click Next. It will move to the Finish page. In here remove installation folder button.
Without doing this the installation process will not be completed. In earlier versions of Joomla, this step must be taken in manually. But in Joomla1.6 it’s much easy to do with a button 🙂 . After clicking the remove installation folder button, you should see the message Installation folder successfully removed.
Then click the button Administrator and you should be able to login with the username: admin and the password you gave.
If you did everything correctly, it will look like this… 😀
And the site login look like this… 😀
Ok Now you can go on with Joomla 1.6 Any time you can start Joomla just typing this on your browser’s Address bar : http://localhost/joomla (XAMPP should have started before..) 😀 😀
Thank you
Enjoy it
Gihan Malan De Silva


Great boy keep it up
Hello, i cant find your twitter account on site, can you send, i want became ur follower in twitter
Thanks for reporting . And I fixed it. And Vilma if you want to follow me on twitter here is my twitter: http://www.twitter.com/gihanmalan and you are welcome..
Lots of usefull facts plus idea, because both versions every one of us require, are grateful for this particular.
My English communication isn’t so good butprobably I understand everything. Thank u so well for that awesome blog message. I jolly be glad reading it. I think you happen to be a superb author. At this time added your blog to my favorites and will appear back again to ur web web page. Hold up that magic work. I residence to see much more soon.
thanks Gihan i like ur tutorials
The configuration processes with XAMPP went fine for me! I really love to read and execute all the stuff!